-1.png?width=1458&height=276&name=LinkedIn%20Cover%20Image%20(3)-1.png "LinkedIn Cover Image (3)-1")
-1.png?width=1452&height=302&name=LinkedIn%20Cover%20Image%20(4)-1.png "LinkedIn Cover Image (4)-1")

Part 3 of a series on AWS serverless apps
Nothing says production-ready code like 0% code coverage.
I’m kidding of course! If you have been following along since part 1, you already know we are in need of some tests. No code should be in production without some level of testing.
The goal is always to fail fast and catch as much as possible before consumers get a hold of our products.
Welcome to part 3 of the AWS serverless app tutorial where we will cover testing and debugging with our serverless drug-search API. For a more detailed breakdown of building a Serverless API on AWS and how to use Jest with your Serverless project, check out the book by the author, Building Serverless Node.js Apps on AWS.
Building Serverless Node.js Apps on AWS: A Brief Guide on Where to Start
Buy Building Serverless Node.js Apps on AWS: A Brief Guide on Where to Start: Read Kindle Store Reviews - Amazon.comwww.amazon.com
Objective
In this final part of the AWS serverless app tutorial set, we will be writing some small tests for our drug-search service. To start from the beginning, follow the steps in AWS Serverless App: Where to Start.
What we should have so far in our project is a singular controller that calls the NLMSearch service and a couple of helper files. Our test will call the getDrugIdentifiers function within the drug search controller.
Environment Setup
We will be using Sinon to use the test spy’s calledWith method and Chai as the assertion library. To install the chai and sinon modules, use the following command:
Writing Tests
In our mocha.opts file in the root directory, we have written it to process anything named *.test.js in any folder.
If you haven’t already done so, create a directory called test in the root of your project.
Create another directory within test called functions. In functions, we will create a test file called drugSearchCtrl.test.js. Copy and paste the following contents into the file:
Here we have our file broken down into two contexts, proper input, and improper input. In the input missing context, we placed a call with an assertion that it should return with a status code of 400.
In the input ok context, we placed a call with an assertion that it should return a successful search with a status code of 200 and a populated body.
By doing this, we test the minimal contract expected. Either we provide the endpoint proper data as a consumer or we do not. If successful, we should return successful status codes in the 200’s. In the case of bad requests or bad data, we should throw something in the 400's.
In the successful search context, we also leveraged the Sinon spy feature to assert that the nlmDrugImageSearch function in nlmSearch.js is being called by the getDrugIdentifiers function with the drug name being passed in as the parameter.
Executing Tests
If you have been following along with parts 1 and 2 of the tutorial, your package.json will likely have all the right setup in the scripts section. If not, feel free to copy the following into your scripts section:
"scripts": {

   "start": "sls offline --noAuth",

   "test": "SLS_DEBUG=* NODE_ENV=test PORT=9100

   ./node_modules/.bin/nyc ./node_modules/.bin/mocha --opts

   mocha.opts",

   "debug": "export SLS_DEBUG=* && node --inspect

   /usr/local/bin/serverless offline -s dev --noAuth",

   "offline": "sls offline start",

   "precommit": "eslint .",

   "pretest": "eslint --ignore-path .gitignore ."

}
Now with this setup, we will be able to run our tests and attach a debugger. Let’s try to run the test with the following command:
<code>npm test</code>
You will now see the NYC module print out the updated coverage for the files:
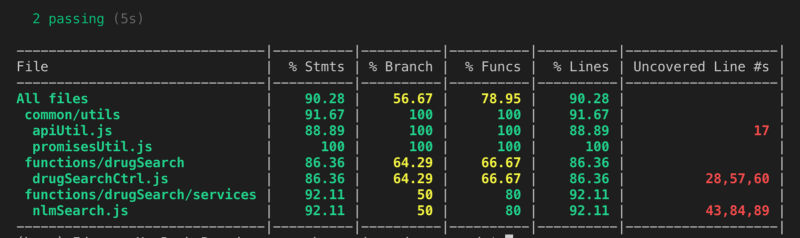
As you can see, we are off to a great start.
The areas in green are in good standing but the areas in yellow and red need further attention. All the way to the right in the column labeled Uncovered Line #s, the NYC module will provide which lines are not covered at all by the tests.
Connect a Debugger
Troubleshooting issues in code is nearly impossible without a debugger. Most editors will have this option available, even for Node projects. The one I’ll walk you through in this article is the VS Code debugger.
To set up the debugger in VS Code for your server, click on the bug on the left-hand side and click add configuration. You will need to add the following:
{

   "type":"node",

   "request":"launch",

   "name":"run serverless offline",

   "program":"${workspaceRoot}/node_modules/.bin/sls",

   "args":[

      "offline",

      "--noAuth"

   ]

}
This will work with the server on port 3000 and will pass in the noAuth argument in the case that you had set your functions to be locked down in the serverless.yml file as private.
In your editor, set up a breakpoint somewhere in the logic where you intend to start stepping through the code. If you start the debugger and submit a request via Postman or another REST API client, your debugger should now hit whatever breakpoint you had set.
To set up the debugger for tests, add the following as well to your configuration:
{

   "type": "node",

   "request": "launch",

   "name": "Mocha Tests Debug",

   "program": "${workspaceFolder}/node_modules/mocha/bin/_mocha",

   "args": [

      "--timeout",

      "999999",

      "--colors",

      "'${workspaceFolder}/{,!(node_modules)/}*/*.test.js'"

   ],

   "console": "integratedTerminal",

   "internalConsoleOptions": "neverOpen"

}
Previously, we had set up the sls offline — noAuth command in the bootstrap.test.js file which will bypass the need for API keys and the like during testing.
If you run this particular configuration in the debugging view, it will run all tests in debug mode and will hit the breakpoint you had set up.
Once the debugger is done starting up, your editor will show the toolbar that will give you the ability to step over, into, out of, or resume/continue operation.
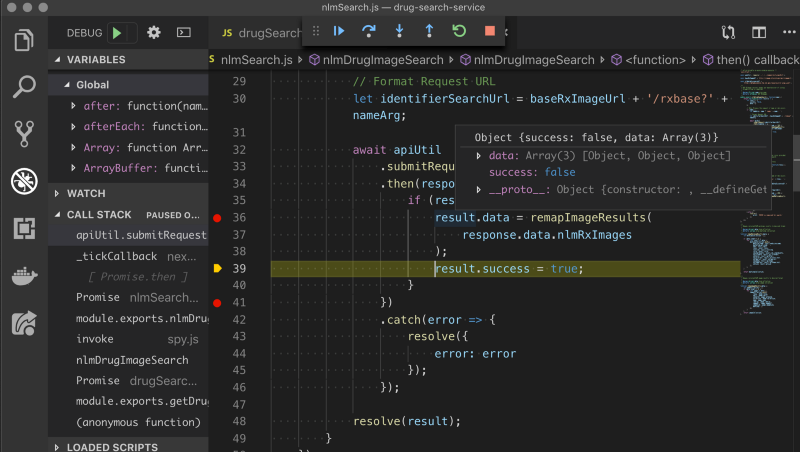
Once the debugger hits that breakpoint, you will be able to use the debugging tools and check out the value of the variables within scope.
Final Words
That’s it for the AWS serverless app tutorial set.
There is, of course, so much more that can be done. For now, have fun expanding on the project or starting off with a new one! I hope that this tutorial set was able to shed some light on some of the main points of development with serverless projects.
Thanks for reading and happy hacking!