AWS Serverless App: Where to Start
Part 1 of a series on AWS serverless apps
Background
There’s been a significant shift towards serverless architectures — and with good reason.
Serverless is a computing model that provides the ease of running your application in the cloud without dealing with the hassle of managing the infrastructure. The resources are dynamically scaled and managed as needed. It only charges for back-end services on a per-use basis or pay-per-use, as it’s commonly referred to.
Instead of operating an EC2 instance for the full cost, you can be paying 20 cents per million calls with the first million calls in a month being free (at least for the Lambda resource). Your team’s proof-of-concept API or service can be nearly free while in development mode.
The Serverless Framework takes away the need for developers to wire up services and deal with the infrastructure manually. As the creators put it, it allows developers to focus on development. We’ll be leveraging this framework in our walkthrough to take away the need of figuring out how to wire the AWS resources together.
This post is Part 1 of the AWS Serverless App tutorial, where I will show you the creation of a serverless app from concept to seeing it deployed in AWS. For a more detailed breakdown of building a
Serverless API on AWS, check out the book by the author, Building Serverless Node.js Apps on AWS.
Building Serverless Node.js Apps on AWS eBook
Objective
We all take some form of medication, but do we always know the shape, color, or side effects of the medicine we take? Will we remember it on the drop of a dime if our pills got mixed up? Well, let’s build something that can help us with this. We’ll be creating a drug-search API using NodeJS.
Our API will return the images as well as the markings associated with the drug via the National Library of Medicine (NLM) API.
Environment Setup
Before we begin, you’ll need a few things to get started:
- An editor like VS Code or Atom
- NPM and Node installed on your machine or VM
- Postman or another REST-client alternative
- An AWS account
Create base project
Install the Serverless CLI on your computer with:
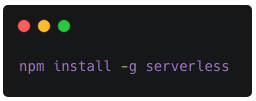
Navigate to the directory where you host all your projects, and kick off the serverless creation command with the AWS NodeJS template:

The following is what is autogenerated by this process:
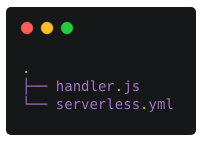
It’s rather basic, so let’s add a few things.
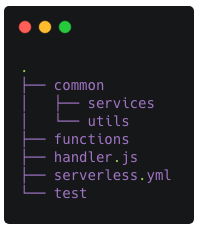
In the project’s root, add the following directories:
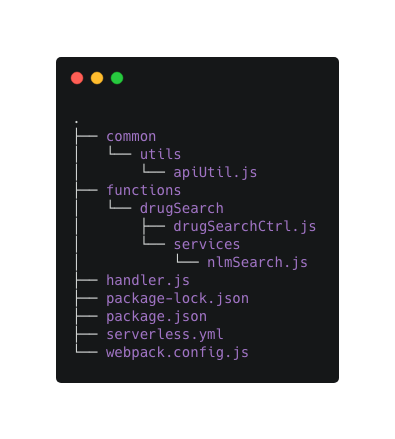
functionscommon(with aservicesand autilsdirectory under it)test
We’ll be working with the functions and services directories this time.
The result should appear as follows:
Add a package.json file to the root of the project and copy-paste the following into it:
{
  "name": "drug-search-service",
  "version": "1.0.0",
  "description": "Drug Search Service API code",
  "main": "handler.js",
  "scripts": {
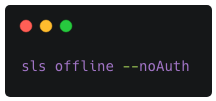
    "start": "sls offline --noAuth",
    "test": "SLS_DEBUG=* NODE_ENV=test PORT=9100 ./node_modules/.bin/nyc ./node_modules/.bin/mocha --opts mocha.opts",
    "debug": "export SLS_DEBUG=* && node --inspect /usr/local/bin/serverless offline -s dev --noAuth",
    "offline": "sls offline start",
    "precommit": "eslint .",
    "pretest": "eslint --ignore-path .gitignore ."
  },
  "repository": {
    "type": "git",
    "url": "git+https://github.com/EdyVision/drug-search-service.git"
  },
  "keywords": [
    "serverless",
    "drug",
    "search",
    "api"
  ],
  "author": "EdyVision",
  "license": "ISC",
  "bugs": {
    "url": "https://github.com/EdyVision/drug-search-service/issues"
  },
  "homepage": "https://github.com/EdyVision/drug-search-service#readme",
  "dependencies": {
    "axios": "^0.19.0",
    "serverless-webpack": "^5.3.1",
    "webpack": "^4.35.0",
    "webpack-node-externals": "^1.7.2"
  },
  "devDependencies": {
    "chai": "^4.2.0",
    "eslint": "^6.0.1",
    "eslint-config-node": "^4.0.0",
    "eslint-config-prettier": "^6.0.0",
    "eslint-plugin-prettier": "^3.1.0",
    "husky": "^3.0.0",
    "mocha": "^6.1.4",
    "nyc": "^14.1.1",
    "prettier": "^1.18.2",
    "serverless": "^1.46.1",
    "serverless-offline": "^5.5.0",
    "serverless-prune-plugin": "^1.3.2",
    "sinon": "^7.3.2"
  }
}
In your terminal window from within the root directory of your project, run npm install to install dependencies.
All right. Let’s begin!
Adding the Logic
We will need a single GET endpoint. This endpoint will be wired to a controller that’ll then call the NLM service. The NLM service will be reaching out to the NLM API via API util.
The call sequence is thus:
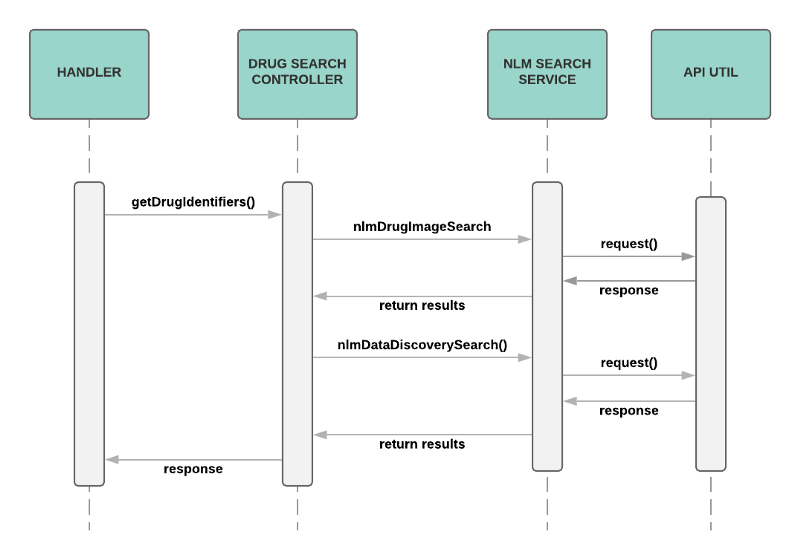
You will need to replace a majority of your serverless.yml file to have the following:
# Serverless Drug Search Service

service: drug-search-service

provider:
  name: aws
  runtime: nodejs8.10
  stage: ${opt:stage, 'dev'}
  region: us-east-1
  apiGateway:
    apiKeySourceType: HEADER

functions:
  getDrugIdentifiers:
    handler: handler.getDrugIdentifiers
    events:
        - http:
            path: drug/search/getDrugIdentifiers
            method: get
            cors: true
            private: false

plugins:
  - serverless-webpack
  - serverless-offline
  - serverless-prune-plugin

custom:
  webpackIncludeModules: true
  # Prune Old Deployments, otherwise you'll max out on storage space
  prune:
    automatic: true
    number: 3
We have a few things going on in the serverless.yml file. Apart from defining the service name, the cloud service provider, the region, and the run time, we also have some plugins and custom settings. We leverage the prune plugin to get rid of old deployments; otherwise, you will run out of storage space. At the time of this writing, it’s 75 GB max for the Lambda Function and layer storage. The offline plugin is used to run the functions locally on your computer. The webpack plugin is used to assist with the bundling and some configurations. In custom, we instruct it to include modules when bundling and to prune automatically. Speaking of webpack, we will need a config. At the root of your project, create a webpack.config.js file. In it, copy and paste the following content:
const slsw = require('serverless-webpack');
const nodeExternals = require('webpack-node-externals');

module.exports = {
    entry: slsw.lib.entries,
    target: 'node',
    devtool: 'source-map',
    externals: [nodeExternals()],
    mode: slsw.lib.webpack.isLocal ? 'development' : 'production',
    optimization: {
        minimize: false
    },
    performance: {
        hints: false
    },

    module: {
        rules: []
    }
};
The functions section in the serverless.yml file has the end-point definitions, such as the path and what handler functions are attached to it. Please note we have set the private setting under the HTTP section of this endpoint to false for now. Switching this value to true will enforce the need for API keys and usage plans. We’ll get into those in a later article. Let’s fix up the handler for our endpoint. Replace your handler.js content with the following:
'use strict';

const drugSearch = require('./functions/drugSearch/drugSearchCtrl');

module.exports.getDrugIdentifiers = async (event) => {
  return drugSearch.getDrugIdentifiers(event);
};
Here the endpoint with the path drug/search/getDrugIdentifiers and mapped to this handler function will be tied to the drugSearch controller. Let’s create the controller and NLM-search service now. Create a directory under functions called drugSearch, and in it, place a file called
drugSearchCtrl.js.
'use strict';

const nlmSearch = require('./services/nlmSearch');

// Headers needed for Locked Down APIs
const headers = {
    'Access-Control-Allow-Origin': '*',
    'Access-Control-Allow-Headers':
        'Origin, X-Requested-With, Content-Type, Accept, X-Api-Key, Authorization',
    'Access-Control-Allow-Credentials': 'true'
};

/**
 * Drug Identifier Search Endpoint
 *
 * @param {*} query Required Query Input: Name or NDC
 * @returns {Promise} drug identifiers
 */
module.exports.getDrugIdentifiers = query => {
    return new Promise(async resolve => {
        let resp = {
            results: {
                name: '',
                identifier: {},
            },
            errors: [],
            statusCode: 400
        };

        if (query && query.queryStringParameters) {
            let drugName = query.queryStringParameters.drugName;
            if (!drugName) {
                resolve({
                    statusCode: 400,
                    body: JSON.stringify({
                        error: 'Drug name parameter is empty!!!'
                    }),
                    headers: headers
                });
            } else {

                let nlmRxImageSuccess = false;
                let nlmDrugDatabaseSuccess = false;

                // Call the NLM Drug Image Search Service
                await nlmSearch
                    .nlmDrugImageSearch(drugName)
                    .then(async response => {
                        resp.results.identifier = {
                            name: drugName,
                            nlmRxImages: response.data
                        };
                        nlmRxImageSuccess = response.success;

                        // Use the RXCUIs from the images to grab
                        // markings from the NLM Discovery Search
                        // service
                        for (let image of resp.results.identifier.nlmRxImages) {
                            await nlmSearch
                                .nlmDataDiscoverySearch(image.rxcui)
                                .then(response => {
                                    image.markings = response.data;
                                    nlmDrugDatabaseSuccess = true;
                                })
                                .catch(error => resp.errors.push(error));
                        }

                    })
                    .catch(error => resp.errors.push(error));

                resolve({
                    statusCode: nlmRxImageSuccess || nlmDrugDatabaseSuccess ? 200 : 400,
                    body: JSON.stringify(nlmRxImageSuccess || nlmDrugDatabaseSuccess ? resp.results : resp.errors),
                    headers: headers
                });
            }

        } else {
            resolve({
                statusCode: 400,
                body: JSON.stringify({ error: 'Query is empty!' }),
                headers: headers
            });
        }
    });
  };
Create a directory called services under the folder drugSearch, and in it, create a file called nlmSearch.js. Copy and paste the following in it:
'use strict';

const apiUtil = require('../../../common/utils/apiUtil');

const baseRxImageUrl = 'http://rximage.nlm.nih.gov/api/rximage/1';

const nlmDataDiscoveryUrl =
    'https://datadiscovery.nlm.nih.gov/resource/crzr-uvwg.json?';

/**
 * NLM RxImage returns images per manufacturer of a drug.
 * A name string is required.
 *
 * @param {String} name drug name
 * @returns {Promise} NLM RxImages
 */
module.exports.nlmDrugImageSearch = function(name) {
    return new Promise(async resolve => {
        let result = {
            success: false,
            data: {}
        };

        // Only Process the request if name or ndc exists
        if (name) {
            let nameArg = name ? 'name=' + name : '';

            // Format Request URL
            let identifierSearchUrl = baseRxImageUrl + '/rxbase?' + nameArg;

            await apiUtil
                .submitRequest(identifierSearchUrl)
                .then(response => {
                    if (response.statusCode == 200){
                        result.data = remapImageResults(response.data.nlmRxImages);
                        result.success = true;
                    }
                })
                .catch(error => {
                    resolve({
                        error: error
                    })
                });

            resolve(result);
        }
    });
};

/**
 * NLM Data Discovery returns markings per rxcui provided.
 * A rxcui string is required for this search.
 *
 * @param {String} rxcui rxcui
 * @returns {Promise} drug markings per rxcui
 */
module.exports.nlmDataDiscoverySearch = function(rxcui) {
    return new Promise(async resolve => {
        let result = {
            success: false,
            data: []
        };

        // Only Process the request if name or ndc exists
        if (rxcui) {
            let rxcuiArg = rxcui ? 'rxcui=' + rxcui : '';

            // Format Request URL
            let identifierSearchUrl = nlmDataDiscoveryUrl + rxcuiArg;

            await apiUtil
                .submitRequest(identifierSearchUrl)
                .then(response => {
                    if (response.statusCode == 200) {
                        result.success = true;
                        result.data = remapMarkingResults(response.data);
                    }
                    resolve(result);
                })
                .catch(error => {
                    resolve({
                        error: error
                    })
                });
        } else {
            resolve({
                error: 'RXCUI is required for search.'
            });
        }
    });
};

/**
 * Remaps returned NLM markings results to desired format
 *
 * @param {Array} data drug collection
 * @returns {Array} drug markings collection
 */
function remapMarkingResults(data) {
    let markingsCollection = [];

    if (data.length > 0) {
        for (let result of data) {
            markingsCollection.push({
                medicine_name: result.medicine_name,
                marketing_act_code: '',
                ndc9: result.ndc9,
                rxcui: result.rxcui,
                rxstring: result.rxstring,
                rxtty: result.rxtty,
                splIngredients: result.spl_ingredients,
                splStrength: result.spl_strength,
                splColor: result.splColor,
                splColorText: result.splcolor_text,
                splImprint: result.splimprint,
                splShape: result.splshape,
                splShapeText: result.splshape_text,
                splSize: result.splsize
            });
        }
    }

    return markingsCollection;
};

/**
 * Remaps returned NLM image results to desired format
 *
 * @param {Array} data drug collection
 * @returns {Array} drug image collection
 */
function remapImageResults(data) {
    let imageCollection = [];
    if (data.length > 0) {
        for (let image of data) {
            imageCollection.push({
                rxcui: image.rxcui,
                ndc11: image.ndc11,
                splSetId: image.splSetId,
                splVersion: image.splVersion,
                name: image.name,
                labeler: image.labeler,
                imageUrl: image.imageUrl,
                imageSize: image.imageSize,
                markings: []
            });
        }
    }
    return imageCollection;
};
As you can see, the nlmSearch functions call apiUtil.js. This is where we house the common Axios calls to call out external APIs. This will go in the common/utils path. Under common/utils, create the apiUtil.js file,
and paste the following in it:
'use strict';

const axios = require('axios');

exports.submitRequest = async function(url, headers) {
    try {
        let result = {
            statusCode: 500,
            data: {}
        };
        return axios.get(url, headers).then(response => {
            result.statusCode = response.status;
            result.data = response.data;
            return result;
        });
    } catch (error) {
        console.error(error);
    }
};
Your new project structure should look like this:
Starting the server
Now that we have everything we need, let’s try to start the server:
Using Postman or your favorite REST client, you should be able to reach the following endpoint (please note the sample prescription drug placed in the drugName query-string parameter):
http://localhost:3000/drug/search/getDrugIdentifiers?drugName=albuterol
Deploying to AWS
To deploy to AWS, you’ll need to create a service account.
Sign into your AWS account, and navigate to the IAM service. Create a new user group calledadmin-group with the Administrator Access policy attached. Typically, you would want a specially crafted policy with granular permissions for your account, but let’s stick with this for this example.
You will then want to add a new user, say demo-service-account and add them to the group. Your demo-service-account user should only have programmatic access and not console access.
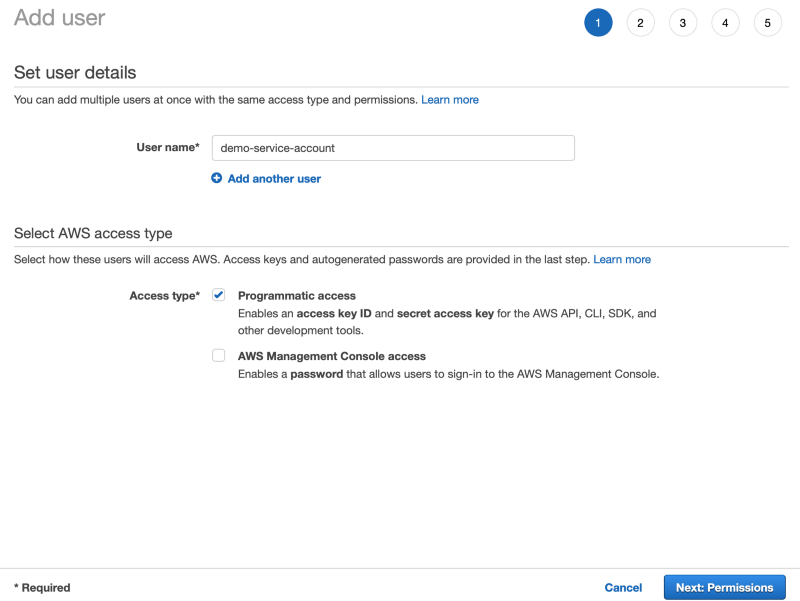
Attach the user to the service account group you just created and
complete the process. Add the access key and secret access key generated from the setup to your bash profile or environment variables.
export AWS_ACCESS_KEY_ID="YOUR_ACCESS_KEY_ID"

export AWS_SECRET_ACCESS_KEY="YOUR_SECRET_ACCESS_KEY"
Now that your account is set up, run the following to deploy your
service to AWS:

The framework will output the resource details and will appear
similar to the following:
The stack information is provided, such as the bucket name used for the deployment, the function, the endpoint, etc. That endpoint should now be reachable via your REST client. For the full solution, please check out the sample project on GitHub.
What's Next
That’s it. You’ve set up your drug-search serverless API and deployed it to AWS. In the next post, AWS Serverless App: Continuous Integration and Deployment, we’ll walk through adding CI/CD to your serverless project with the options of Travis CI and Codeship.
Thanks for reading!
-1.png?width=1458&height=276&name=LinkedIn%20Cover%20Image%20(3)-1.png)
-1.png?width=1452&height=302&name=LinkedIn%20Cover%20Image%20(4)-1.png)
